

Incubating eggs can be one of the most exciting parts of raising poultry, but it can also be one of the most frustrating. A batch can look perfect for weeks, only to end with chicks, ducklings, or goslings fully formed inside the shell and never breaking out. Other times, eggs pip but never zip, hatch days drag on too long, chicks come out sticky, or the air cells never look right no matter what the incubator says.
The hard part is that incubator problems are not always obvious while they are happening. A temperature that is slightly low, humidity that is a little too high, poor ventilation during hatch, weak breeder nutrition, bad egg storage, or inconsistent turning can all show up days or weeks later as a poor hatch.
The goal is not to guess. The goal is to read the evidence left behind.
This guide explains how to troubleshoot incubator issues by looking at when the embryo died, what the air cell looked like, whether the egg pipped, how the chick developed, and what the hatch pattern tells you about temperature, humidity, ventilation, turning, and egg handling.
Helpful outside references:
Mississippi State Extension: Trouble Shooting Failures with Egg Incubation
Mississippi State Extension: Important Incubation Factors
Missouri Extension: Small Flock Series, Incubation of Poultry
Mississippi State Extension: Testing Incubated Eggs for Embryo Development
Mississippi State Extension: Pipped Eggs That Do Not Hatch
Illinois Extension: Incubation Troubleshooting
When a hatch goes badly, it is tempting to blame the incubator right away. Sometimes that is correct, but the better first step is to look at the pattern.
Were the eggs clear from the beginning? Did embryos start and then die early? Did they make it almost to hatch and die fully formed? Did they pip but never zip? Did some hatch early while others were late? Were the chicks sticky, weak, swollen, small, or wet-looking?
Those clues matter because different problems show up at different stages.
Clear eggs usually point toward fertility, egg storage, breeder health, age of eggs, or handling before incubation. Blood rings and early embryo death often point toward improper storage, temperature problems, rough handling, contamination, or breeder nutrition. Fully formed chicks that die without pipping are usually a late-incubation problem. Pipped eggs that do not hatch often point toward humidity, ventilation, shrink-wrapping, malposition, or weakness.
A poor hatch is not one single problem. It is a set of symptoms. The more specific you are about the symptoms, the more accurately you can fix the next hatch.
Temperature is one of the most important incubation factors. In a forced-air incubator, the standard target for most poultry eggs is around 99.5°F to 100°F. Still-air incubators usually run warmer because the air layers inside the incubator, so the reading must be taken at the correct egg height.
A small temporary fluctuation is usually not the end of the world. The bigger issue is a temperature that is consistently wrong over time.
If the incubator runs too warm, embryos may develop too quickly, hatch early, become weak, or die late in the shell. High temperature can be especially damaging because it speeds up development and can create stress before hatch. If the incubator runs too cool, the hatch may be delayed, uneven, weak, or drawn out. Low temperature can also cause embryos to develop slowly and may contribute to fully formed chicks that never hatch.
This is why relying only on the incubator’s built-in display can be risky. Many built-in thermometers are not perfectly accurate. The incubator may say 99.5°F while the actual temperature at egg level is higher or lower.
Before blaming humidity, calibrate or cross-check the temperature with a reliable independent thermometer placed at egg height. In a forced-air incubator, check different areas of the incubator too. Some small incubators have warm and cool spots even with a fan.
If a previous hatch ran low, do not automatically crank the next hatch higher to “make up for it.” Running the incubator half a degree higher may speed development slightly, but it can also create new problems if the actual temperature is already accurate or if the machine has hot spots. The better fix is to verify the real temperature at egg level and then run the incubator correctly from the start.
For most forced-air chicken, duck, and goose incubation, 99.5°F is a better target than trying to compensate after the fact.
Humidity is where a lot of people get confused, and for good reason. Different sources give different numbers. One person says 45%. Another says 55%. Another says 60%. Then the hatch fails and everyone argues over which number was “right.”
The better way to think about humidity is this: humidity controls how much moisture the egg loses during incubation. That moisture loss determines air cell size. The air cell is what the chick, duckling, or gosling uses when it internally pips and starts breathing before external pip.
If humidity is too high for too long, the egg does not lose enough moisture. The air cell stays too small. At hatch, the chick may have too little breathing room and may drown or die before it can pip. If humidity is too low for too long, the egg loses too much moisture. The air cell gets too large, membranes can dry, and the chick may become stuck or shrink-wrapped.
That is why candling and air cell tracking are so valuable. You are not just asking, “What humidity should I use?” You are asking, “Are these eggs losing moisture at the correct rate?”
For chicken eggs in many home incubators, humidity around 40% to 50% during most of incubation can work well, especially in a forced-air incubator and especially if air cell growth looks correct. Some extension-style poultry guides recommend higher humidity as a general starting point, but real-world home incubator results often depend on local climate, incubator model, egg shell quality, ventilation, and whether you are hatching chickens, ducks, or geese.
In the Pacific Northwest, indoor humidity can vary a lot by season and house conditions. Brush Prairie, WA and the surrounding region can be damp outside, but indoor heated air can still dry out an incubator. The number on the hygrometer matters less than what the eggs are actually doing.
The best practice is to candle on schedule, watch the air cell, and adjust humidity based on air cell size.
Air cell size is one of the best tools for troubleshooting incubator issues before hatch day.
If the air cell is too small for the stage of incubation, humidity has likely been too high, or the egg has not lost enough moisture. If the air cell is too large, humidity has likely been too low, or the egg has lost moisture too quickly.
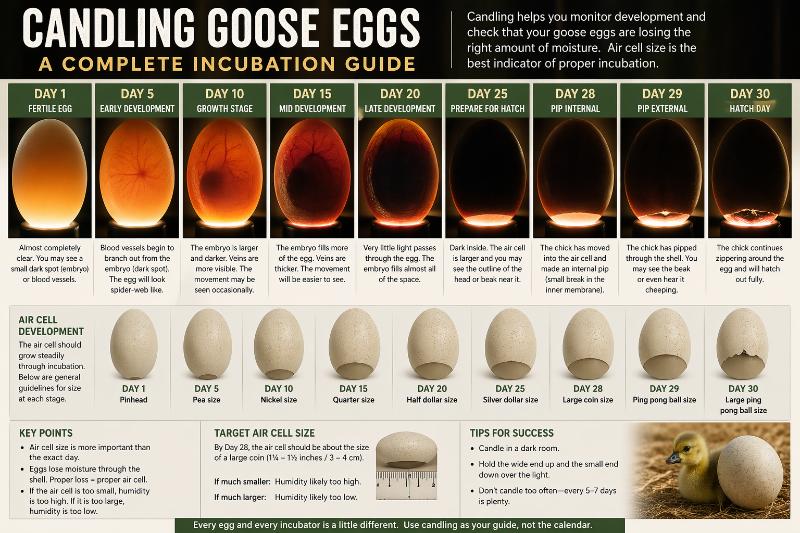
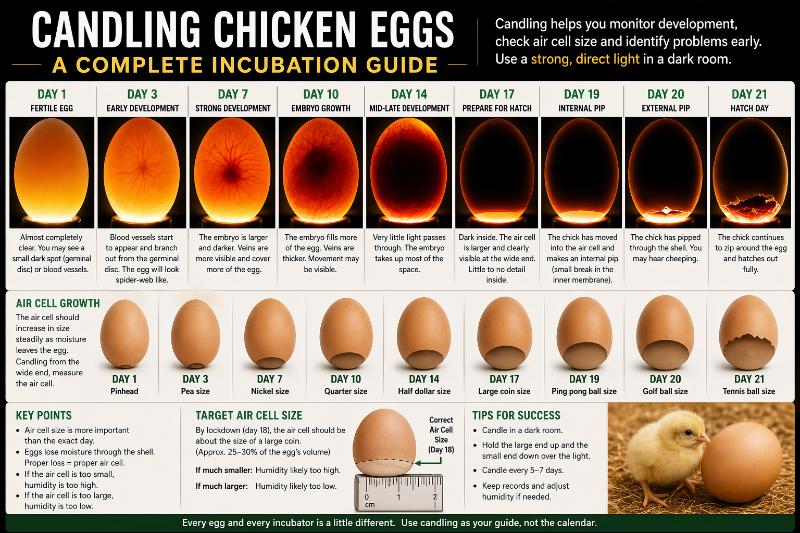
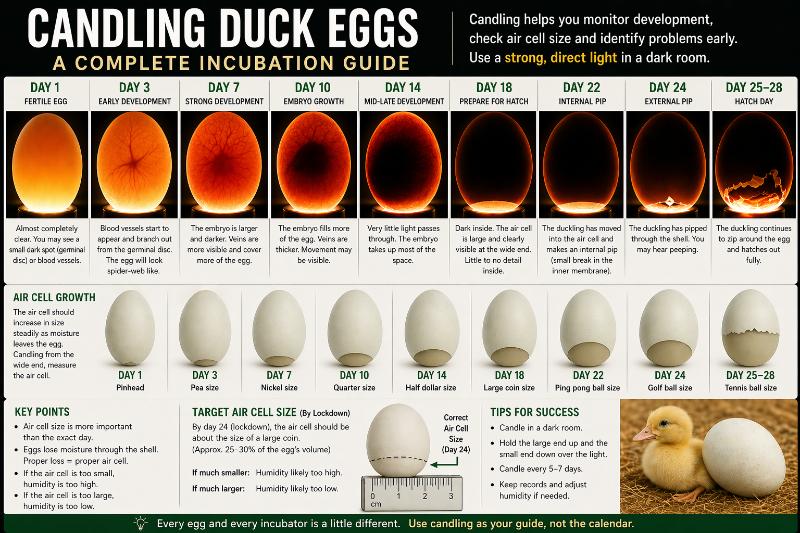
For chicken eggs, candling around day 7, day 14, and again before lockdown gives you a good idea of whether the air cell is growing correctly. Duck and goose eggs have longer incubation periods, so they need to be checked over a longer timeline. With goose eggs especially, air cell tracking becomes very important because they can be more difficult to hatch artificially than chicken eggs.
A healthy air cell should grow gradually. It should not stay tiny all the way to lockdown. It also should not become huge too early.
If chicks are fully formed but never pip, one of the first things to look at is the air cell. A small air cell points toward humidity being too high during incubation. A very large air cell points toward humidity being too low. Either extreme can cause late-stage losses.
This is why it is useful to mark the air cell with pencil each time you candle. Over the course of incubation, those marks show whether the egg is losing moisture at a normal rate.
One of the most frustrating hatch problems is opening eggs after hatch is clearly over and finding chicks fully formed but dead without an external pip. They made it almost all the way, but never broke the shell.
This usually means the problem happened late, but the cause may have started earlier.
Possible causes include improper humidity, poor air cell development, low temperature over time, high temperature stress, poor ventilation, malposition, weak embryos, inadequate turning, breeder nutrition issues, old eggs, or eggs that were stored poorly before incubation.
If many chicks are fully formed but never pipped, look closely at the air cells and the timing of the hatch.
If the hatch was late overall, the incubator may have been running cool. If it was early, the incubator may have been warm. If air cells were small, humidity was likely too high during incubation. If membranes were dry and tight, humidity may have been too low near hatch or the incubator may have been opened too much during lockdown. If the chicks were malpositioned, turning, egg placement, or breeder-related factors may be involved.
Fully formed but no pip is rarely fixed by just raising lockdown humidity. Lockdown humidity matters, but if the egg did not lose the right amount of moisture over the full incubation period, the chick may already be in trouble by the time lockdown begins.
For the next hatch, verify actual incubator temperature with a separate thermometer, track air cells, avoid over-humidifying early incubation, keep vents open, stop turning at the correct time, and avoid opening during hatch unless absolutely necessary.
If an egg pips but the chick does not continue hatching, the chick was usually alive and developed enough to start the hatch process. That means something in the final stage may have stopped it.
Mississippi State Extension notes that pipped eggs that do not hatch are commonly related to poor ventilation or improper humidity. The oxygen demand inside the incubator increases dramatically near hatch. Chicks are no longer just developing quietly inside the egg. They are breathing, working, and trying to get out.
This is where people accidentally create problems. They see humidity dropping and close the vents to hold moisture. That can backfire. Closing vents during hatch can reduce oxygen when the chicks need it most. Humidity should be raised by increasing water surface area, adding warm water, or using other incubator-safe methods, not by choking off ventilation.
If the membranes around the pip become dry, tan, tight, or leathery, the egg may have lost too much humidity after pip or the incubator may have been opened too often. Once an egg externally pips, opening the incubator can dry membranes very quickly.
The best lockdown rule is simple: get humidity and ventilation right before hatch begins, then leave the incubator closed as much as possible.
Sticky chicks and dry membranes are two different clues.
Sticky chicks are often associated with humidity being too high during incubation, temperature problems, or eggs not losing enough moisture. The chick may hatch coated with egg residue and struggle to dry properly.
Dry, tight membranes are more often associated with low humidity during hatch, opening the incubator after external pips, or too much moisture loss. This is what people often call shrink-wrapping.
The confusing part is that both high humidity and low humidity can cause hatch problems. That is why the appearance of the chick, shell, membrane, and air cell matters.
A chick that is wet, swollen, and surrounded by excess fluid is not telling the same story as a chick trapped in a dry, tight membrane.
Ventilation is one of the most overlooked incubation factors. The embryo needs oxygen and releases carbon dioxide. That exchange becomes even more important as hatch approaches.
During the final stage, the chick internally pips into the air cell and begins using its lungs. Oxygen demand rises. If vents are closed too much, the chick can suffocate even when temperature and humidity look fine.
This is especially important in small incubators where people try to increase humidity by closing vent holes. That can make the hygrometer look better while making the hatch environment worse.
If humidity needs to come up for lockdown, increase water surface area instead. Use the incubator’s channels, add a sponge if appropriate for your model, or add warm water quickly without leaving the lid open. Keep ventilation open enough for proper air exchange.
A good hatch needs both moisture and oxygen.
Turning is not just a routine chore. It helps keep the developing embryo from sticking to the shell membranes and supports normal development and positioning.
For chicken eggs, turning is most important during the first half of incubation, especially while membranes and circulation are developing. Most home incubation routines turn chicken eggs at least three times per day until lockdown, or use an automatic turner until around day 18.
Duck and goose eggs also need regular turning, and many people hand-turn larger waterfowl eggs because they do not always fit or roll well in standard automatic turners.
If eggs are not turned enough, embryos can stick, develop poorly, die early, or end up malpositioned. If eggs are turned too aggressively or rotated incorrectly, that can also create issues.
When troubleshooting a hatch, ask whether the turner worked every day, whether eggs were positioned correctly, whether any eggs got stuck in the rails, and whether large eggs were actually moving enough.
Some hatch problems begin before the eggs ever enter the incubator.
Eggs that are too old, stored too warm, stored too cold, handled roughly, washed improperly, contaminated, or collected infrequently may have lower hatch rates. Breeder health and nutrition also matter. Fertility is not the same thing as hatchability. An egg can be fertile but still fail because the embryo is weak or conditions before incubation were poor.
For best results, set clean, normal-shaped eggs from healthy breeding birds. Avoid cracked, badly soiled, misshapen, thin-shelled, or unusually large or small eggs. Store hatching eggs with the point down or according to your species-specific storage routine, keep them in a stable environment, and avoid holding them too long before setting.
If clear eggs are common, look at fertility, rooster or gander activity, male-to-female ratios, age of breeders, seasonal fertility, and egg storage. If embryos start and die early, look harder at storage, sanitation, temperature spikes, rough handling, and breeder nutrition.
Mixed incubation can work, but it adds complications.
Chicken eggs usually hatch around 21 days. Most duck eggs hatch around 28 days, with Muscovy ducks taking longer. Goose eggs are usually around 28 to 35 days depending on breed and conditions. Waterfowl eggs often benefit from cooling and misting routines after the first part of incubation, while chicken eggs do not need that same treatment.
The challenge comes when chicken eggs and goose eggs are in the same incubator. If you have to open the incubator every day to cool and spray goose eggs, the chicken eggs experience those openings too. During early and mid incubation, brief openings are usually not disastrous, especially in a forced-air incubator that recovers quickly. Hens leave nests briefly in nature. The bigger risk is during chicken lockdown and hatch.
Once chicken eggs reach lockdown, opening the incubator for goose egg cooling and spraying becomes more risky because humidity drops can dry membranes after pips. If chicken eggs are externally pipped, even a short opening can cause problems.
The best solution is to avoid mixing hatch timelines when possible. If you are incubating chicken eggs and goose eggs at the same time, use a separate hatcher for the chicken eggs at lockdown. That allows the goose eggs to keep getting their cooling and misting routine without disturbing chicken eggs during the most sensitive hatch window.
If you only have one incubator, try to set eggs so hatch windows do not overlap, or stop opening as much during chicken lockdown. The problem is that this may compromise the goose egg routine. A separate hatcher is the cleaner fix.
Goose eggs can be harder to hatch artificially than chicken eggs. Many experienced goose hatchers use a cooling and misting routine after the first week or so of incubation. The idea is to mimic some of the natural moisture and cooling changes that happen when a goose leaves the nest and returns damp.
A common routine is to begin daily cooling and light misting after the first week, gradually increasing cooling time as incubation progresses, then stopping before hatch. Exact routines vary, and goose eggs should still be managed by air cell development, not blindly by a schedule.
The important point is that cooling and misting goose eggs should not create chaos for other eggs in the incubator. If chicken eggs are also inside, goose egg care can conflict with chicken lockdown. That is why a separate hatcher is strongly recommended if you are running mixed species.
Lockdown is the final stage before hatch. For chicken eggs, this usually begins around day 18. Turning stops, humidity is raised, eggs are positioned for hatch, and the incubator should stay closed as much as possible.
Lockdown is not magic. It cannot fix three weeks of incorrect temperature or moisture loss. Its job is to protect the final hatch process.
During lockdown, the priorities are stable temperature, adequate humidity, good ventilation, and minimal disturbance.
Humidity should be high enough to keep membranes from drying after pip, but ventilation should not be reduced to achieve it. Do not close vents just to force the humidity number up. Use water surface area instead.
Once pipping begins, avoid opening the incubator unless there is a clear reason. Every opening can drop humidity and affect membranes. The more eggs pipping at the same time, the more careful you need to be.
Assisted hatching is a separate topic, but it comes up during incubator troubleshooting because people often intervene when they see a chick struggling.
The hard truth is that some chicks are not hatching because something is wrong. Helping every struggling chick can save some birds, but it can also create weak chicks that may not thrive. On the other hand, a chick that is shrink-wrapped because the incubator was opened may be in trouble through no fault of its own.
Before assisting, look at timing. A chick can pip and then rest for many hours before zipping. That pause is normal. The chick is absorbing yolk, blood vessels are shutting down, and it is preparing for the final push.
Assistance becomes more reasonable when the chick has pipped, enough time has passed, the membrane is clearly dry and tight, and the chick is still active but unable to rotate. Even then, it should be slow, careful, and focused on not causing bleeding.
For troubleshooting purposes, do not use assisted hatching as the main fix. Use it as an emergency response. The real fix is correcting the incubation conditions that caused the problem.
After a poor hatch, take notes before cleaning everything up. This is where you learn the most.
Record the incubator model, egg species, set date, hatch date, average temperature, independent thermometer reading if available, humidity range, lockdown humidity, whether vents were open, how often the incubator was opened, turning schedule, egg age, breeder flock notes, and any power outages.
Then examine unhatched eggs carefully. Candle first. If the hatch is completely over, open eggs from the air cell end and look at development stage, air cell size, membrane condition, chick position, yolk absorption, and whether there was an internal or external pip.
If the egg is clear, the issue may be fertility or very early death. If there is a blood ring, the embryo started but died early. If the embryo is partly developed, look at temperature, turning, contamination, and breeder health. If the chick is fully formed with no pip, look at humidity over the full incubation period, air cell size, temperature accuracy, ventilation, and positioning. If the chick pipped but died, look hard at lockdown humidity, ventilation, and whether the incubator was opened after pipping started.
The more detailed your notes are, the easier it is to fix the next hatch.
A late hatch usually points toward low temperature, cool spots, old eggs, or weak embryos. An early hatch usually points toward high temperature. A hatch that starts normally but drags out for days can point toward uneven temperatures, mixed egg age, poor storage, or incubator hot and cold zones.
Clear eggs usually point toward fertility or storage. Blood rings often point toward early death, storage issues, temperature problems, or handling. Sticky chicks often point toward humidity or temperature imbalance. Dry membranes usually point toward low hatch humidity or opening the incubator after pips. Fully formed chicks with no pip often point toward humidity, air cell, temperature, ventilation, malposition, or weak embryos.
No single symptom proves one cause every time. The pattern matters.
The next hatch should start with verification.
Use a separate thermometer and hygrometer. Place the thermometer at egg height. Let the incubator run for at least 24 hours before setting eggs. Confirm that the temperature is stable and that the incubator recovers after brief openings.
Track air cells with pencil marks when candling. Do not adjust humidity based only on a random number from the internet. Adjust it based on whether the eggs are losing moisture correctly.
Keep vents open enough for air exchange, especially at hatch. Do not close vents just to raise humidity. Increase humidity by increasing water surface area.
Use a separate hatcher if you are incubating mixed species, especially if goose eggs need cooling and spraying while chicken eggs are entering lockdown.
Stop turning at the correct time. Avoid opening during hatch. Take detailed notes. After each hatch, compare the results to your settings and make one or two controlled improvements instead of changing everything at once.
Learning how to troubleshoot incubator issues is really about learning how to read eggs. The incubator settings matter, but the eggs tell you whether those settings are actually working.
A good hatch depends on temperature, humidity, ventilation, turning, sanitation, egg storage, breeder health, and timing. When something goes wrong, the answer is usually found in the pattern: when the embryo died, how the air cell developed, whether the chick pipped, what the membrane looked like, and whether the hatch was early, late, sticky, dry, weak, or drawn out.
For chicken eggs in a forced-air incubator, stable temperature, correct air cell growth, good ventilation, and minimal lockdown disturbance are the foundation. For duck and goose eggs, moisture loss and species-specific handling become even more important. For mixed hatches, a separate hatcher can prevent one species’ needs from interfering with another’s hatch window.
A failed hatch is frustrating, but it is also useful information. Take notes, read the eggs, correct the real cause, and the next hatch should be stronger.